외로운 Nova의 작업실
Flutter 프로그래밍 - 8(동영상 플레이어) 본문
안녕하세요, 이번 장에서는 동영상 플레이어를 간단하게 Flutter로 만들어보겠습니다.
- 구상하기
첫 화면에서는 동영상 플레이어 logo와 아래 VideoPlayer라는 텍스트를 만들고 Logo를 클릭하면 영상을 플레이하며, 영상 컨트롤러(뒤로, 정지/재생, 앞으로, 다른 영상선택)버튼을 영상위에 표시할 것입니다.
이러한 구조는 화면을 2개 써야할 것 같지만, 이번에는 하나의 위젯으로 2개의 함수를 구현하여 각 화면을 표시하도록 구현해보겠습니다.
- 준비하기
프로젝트 이름 : vid_player
<이미지 추가하기>
Logo 이미지를 추가하겠습니다.

그리고 pubspec.yaml 설정하겠습니다. dependencies 부분에 필요한 패키지들을 추가하고 asset을 추가해줍니다.
name: vid_player
description: "A new Flutter project."
# The following line prevents the package from being accidentally published to
# pub.dev using `flutter pub publish`. This is preferred for private packages.
publish_to: 'none' # Remove this line if you wish to publish to pub.dev

# The following defines the version and build number for your application.
# A version number is three numbers separated by dots, like 1.2.43
# followed by an optional build number separated by a +.
# Both the version and the builder number may be overridden in flutter
# build by specifying --build-name and --build-number, respectively.
# In Android, build-name is used as versionName while build-number used as versionCode.
# Read more about Android versioning at https://developer.android.com/studio/publish/versioning
# In iOS, build-name is used as CFBundleShortVersionString while build-number is used as CFBundleVersion.
# Read more about iOS versioning at
# https://developer.apple.com/library/archive/documentation/General/Reference/InfoPlistKeyReference/Articles/CoreFoundationKeys.html
# In Windows, build-name is used as the major, minor, and patch parts
# of the product and file versions while build-number is used as the build suffix.
version: 1.0.0+1

environment:
  sdk: '>=3.2.3 <4.0.0'

# Dependencies specify other packages that your package needs in order to work.
# To automatically upgrade your package dependencies to the latest versions
# consider running `flutter pub upgrade --major-versions`. Alternatively,
# dependencies can be manually updated by changing the version numbers below to
# the latest version available on pub.dev. To see which dependencies have newer
# versions available, run `flutter pub outdated`.
dependencies:
  flutter:
    sdk: flutter


  # The following adds the Cupertino Icons font to your application.
  # Use with the CupertinoIcons class for iOS style icons.
  cupertino_icons: ^1.0.2
  image_picker: 0.8.5+3
  video_player: 2.4.6

dev_dependencies:
  flutter_test:
    sdk: flutter

  # The "flutter_lints" package below contains a set of recommended lints to
  # encourage good coding practices. The lint set provided by the package is
  # activated in the `analysis_options.yaml` file located at the root of your
  # package. See that file for information about deactivating specific lint
  # rules and activating additional ones.
  flutter_lints: ^2.0.0

# For information on the generic Dart part of this file, see the
# following page: https://dart.dev/tools/pub/pubspec

# The following section is specific to Flutter packages.
flutter:

  # The following line ensures that the Material Icons font is
  # included with your application, so that you can use the icons in
  # the material Icons class.
  uses-material-design: true

  assets:
    - asset/img/

  # To add assets to your application, add an assets section, like this:
  # assets:
  #   - images/a_dot_burr.jpeg
  #   - images/a_dot_ham.jpeg

  # An image asset can refer to one or more resolution-specific "variants", see
  # https://flutter.dev/assets-and-images/#resolution-aware

  # For details regarding adding assets from package dependencies, see
  # https://flutter.dev/assets-and-images/#from-packages

  # To add custom fonts to your application, add a fonts section here,
  # in this "flutter" section. Each entry in this list should have a
  # "family" key with the font family name, and a "fonts" key with a
  # list giving the asset and other descriptors for the font. For
  # example:
  # fonts:
  #   - family: Schyler
  #     fonts:
  #       - asset: fonts/Schyler-Regular.ttf
  #       - asset: fonts/Schyler-Italic.ttf
  #         style: italic
  #   - family: Trajan Pro
  #     fonts:
  #       - asset: fonts/TrajanPro.ttf
  #       - asset: fonts/TrajanPro_Bold.ttf
  #         weight: 700
  #
  # For details regarding fonts from package dependencies,
  # see https://flutter.dev/custom-fonts/#from-packages
- 네이티브 권한 설정하기
이번 프로젝트는 갤러리 관련 권한이 필요합니다. 갤러리에서 사용자가 선택한 동영상을 불러오려면 안드로이드와 iOS모두 갤러리 권한을 추가해야합니다.
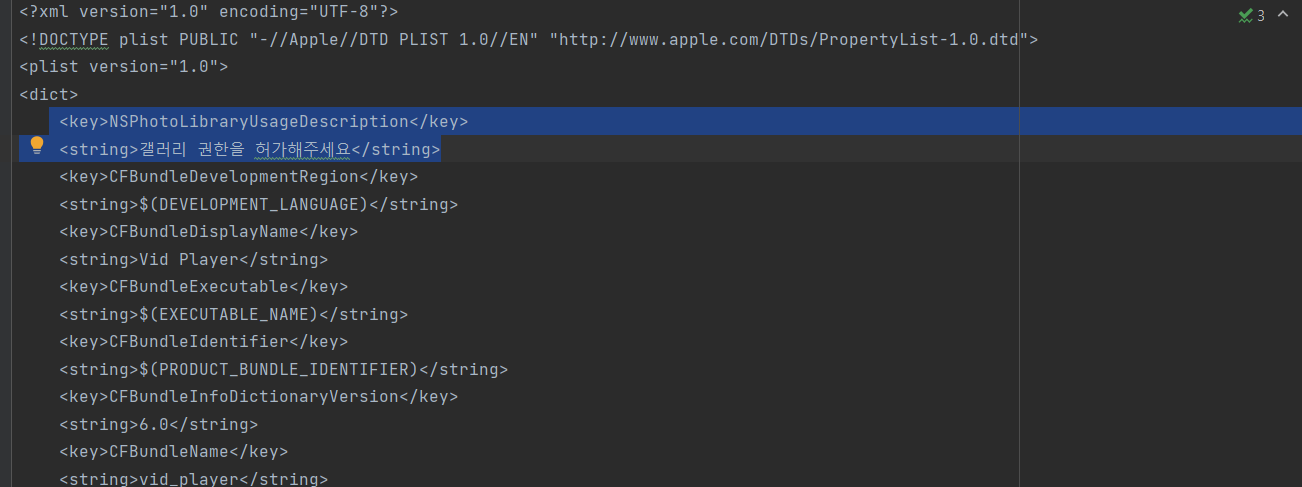
<IOS>
IOS 권한은 Info.plist 파일에서 추가할 수 있습니다. NSPhotoLibraryUsageDescription 권한을 등록해줍니다.
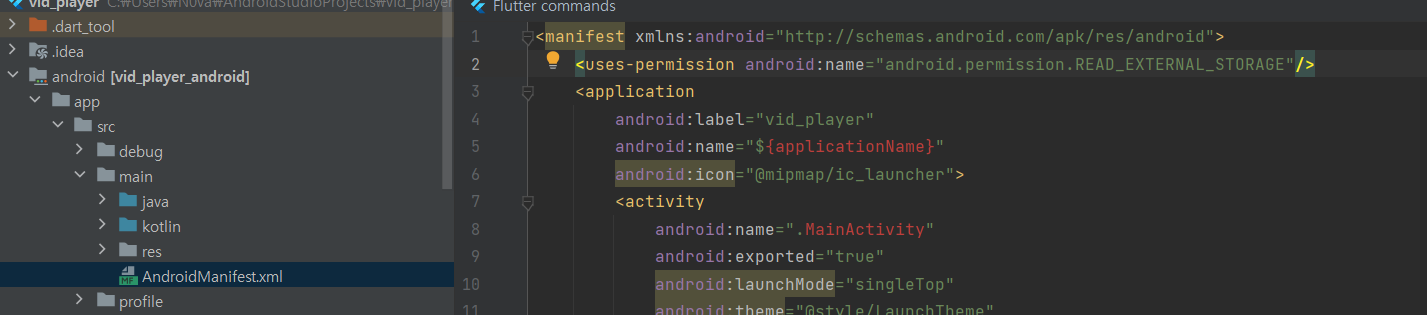
<안드로이드>
안드로이드는 Manifest.xml 파일에 추가할 수 있습니다. READ_EXTERNAL_STORAGE 권한을 줘야합니다.
- 프로젝트 초기화 하기
이제 lib밑에 screen 폴더를 생성하고 기본 홈으로 사용할 HomeScreen 위젯을 생성할 home_screen.dart 파일을 생성하겠습니다.
import 'package:flutter/material.dart';

class HomeScreen extends StatelessWidget{
  const HomeScreen({Key? key}) : super(key: key);

  @override
  Widget build(BuildContext context){
    return Scaffold(
      body: Text("Home Screen"),
    );
  }
}
main.dart 파일도 초기화 해주겠습니다.
import 'package:flutter/material.dart';
import 'package:vid_player/screen/home_screen.dart';

void main() {
  runApp(MaterialApp(
    home: HomeScreen(),
  ));
}
- 레이아웃 구상
첫번쨰 화면인 Icon과 앱이름이 나오는화면을 renderEmpty()함수로 나타내고 두번째인 동영상플레이 화면을 renderVideo()함수로 나타내보겠습니다.
- 첫화면 구현
일단 homescreen이 비디오가 선택됬을떄는 renderEmpty()함수를 실행하고 선택되지 않았을떄는 renderVideo()함수를 실행하도록 구현해보겠습니다.
import 'package:flutter/material.dart';
import 'package:image_picker/image_picker.dart';

class HomeScreen extends StatefulWidget{
  const HomeScreen({Key? key}) : super(key: key);

  @override
  State<HomeScreen> createState() => _HomeScreenState();
}

class _HomeSCreenState extends State<HomeScreen>{
  XFile? video; //동영상 저장 변수

  @override
  Widget build(BuildContext context){
    return Scaffold(
      backgroundColor: Colors.black,

      //동영상 선택에 따른 함수 실행
      body: video == null ? renderEmpty() : renderVideo(),
    );
  }
}

//동영상이 없을때 보여주는 함수
Widget renderEmpty(){
  return Container();
}

//동영상이 있을때 보여주는 함수
Widget renderVideo(){
  return Container();
}
이제 renderEmpty()함수를 작성해보겠습니다.
import 'dart:js';
import 'package:flutter/material.dart';
import 'package:image_picker/image_picker.dart';
class HomeScreen extends StatefulWidget{
const HomeScreen({Key? key}) : super(key: key);
@override
State<HomeScreen> createState() => _HomeScreenState();
}
class _HomeScreenState extends State<HomeScreen>{
XFile? video; //동영상 저장 변수
@override
Widget build(BuildContext context){
return Scaffold(
backgroundColor: Colors.black,
//동영상 선택에 따른 함수 실행
body: video == null ? renderEmpty() : renderVideo(),
);
}
//동영상이 없을때 보여주는 함수
Widget renderEmpty(){
return Container(
width: MediaQuery.of(context as BuildContext).size.width,
child: Column(
mainAxisAlignment: MainAxisAlignment.center,
children: [
_Logo(), //로고 이미지
SizedBox(height: 30.0,),
_AppName(), //앱 이름
],
),
);
}
//동영상이 있을때 보여주는 함수
Widget renderVideo(){
return Container();
}
}
//로고 클래스
class _Logo extends StatelessWidget{
const _Logo({Key? key}) : super(key: key);
@override
Widget build(BuildContext context){
return Image.asset('asset/img/logo.png');
}
}
//앱 이름
class _AppName extends StatelessWidget{
const _AppName({Key? key}) : super(key : key);
@override
Widget build(BuildContext context){
final textStyle = TextStyle(
color: Colors.white,
fontSize: 30.0,
fontWeight: FontWeight.w300);
return Row(
mainAxisAlignment: MainAxisAlignment.center, //글자 가운데 정렬
children: [
Text("VIDEO",
style: textStyle,),
Text("PLAYER",
style: textStyle.copyWith(
//두께만 700으로 변경
fontWeight: FontWeight.w700
),)
],
);
}
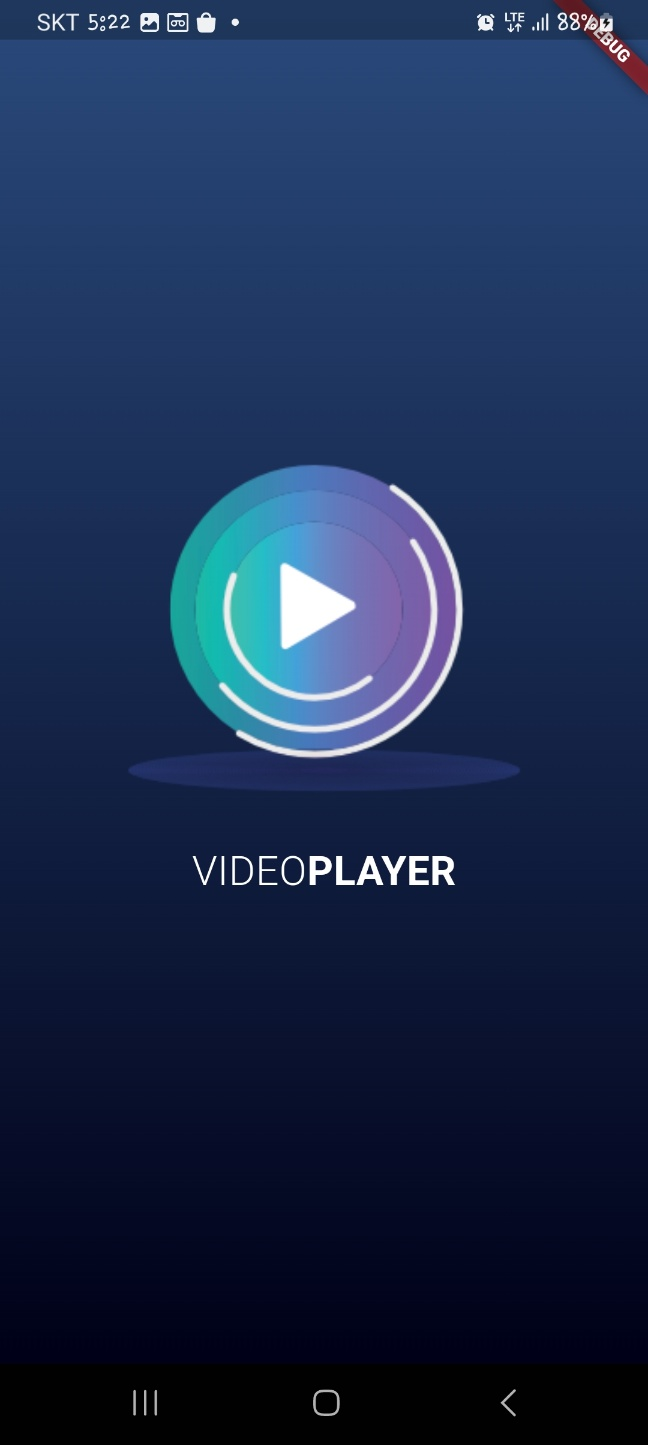
}한번 실행해보겠습니다.

잘 나오는 것을 볼 수 있습니다.
- 배경색 그라데이션 구현
첫번째 배경화면을 그라데이션으로 이쁘게 꾸며보겠습니다. BoxDecoration 클래스를 사용하면 예쁘게 꾸밀 수 있습니다.
import 'dart:js';

import 'package:flutter/material.dart';
import 'package:image_picker/image_picker.dart';

class HomeScreen extends StatefulWidget{
  const HomeScreen({Key? key}) : super(key: key);

  @override
  State<HomeScreen> createState() => _HomeScreenState();
}

class _HomeScreenState extends State<HomeScreen>{
  XFile? video; //동영상 저장 변수

  @override
  Widget build(BuildContext context){
    return Scaffold(
      backgroundColor: Colors.black,

      //동영상 선택에 따른 함수 실행
      body: video == null ? renderEmpty() : renderVideo(),
    );
  }

  //동영상이 없을때 보여주는 함수
  Widget renderEmpty(){
    return Container(
      width: MediaQuery.of(context as BuildContext).size.width,
      decoration: getBoxDecoration(), //함수로부터 값 가져오기

      child: Column(
        mainAxisAlignment: MainAxisAlignment.center,
        children: [
          _Logo(), //로고 이미지
          SizedBox(height: 30.0,),
          _AppName(), //앱 이름
        ],
      ),
    );
  }

  //데코레이션box 반환 함수
  BoxDecoration getBoxDecoration(){
    return BoxDecoration(
      gradient: LinearGradient(
        begin: Alignment.topCenter,
        end: Alignment.bottomCenter,
        colors: [
          Color(0xFF2A4A7C),
          Color(0xFF000118)

        ]
      )
    );
  }

//동영상이 있을때 보여주는 함수
  Widget renderVideo(){
    return Container();
  }
}

//로고 클래스
class _Logo extends StatelessWidget{
  const _Logo({Key? key}) : super(key: key);

  @override
  Widget build(BuildContext context){
    return Image.asset('asset/img/logo.png');
  }
}

//앱 이름
class _AppName extends StatelessWidget{
  const _AppName({Key? key}) : super(key : key);

  @override
  Widget build(BuildContext context){
    final textStyle = TextStyle(
        color: Colors.white,
        fontSize: 30.0,
        fontWeight: FontWeight.w300);

    return Row(
      mainAxisAlignment: MainAxisAlignment.center, //글자 가운데 정렬
      children: [
        Text("VIDEO",
          style: textStyle,),
        Text("PLAYER",
          style: textStyle.copyWith(

            //두께만 700으로 변경
              fontWeight: FontWeight.w700
          ),)
      ],
    );
  }

}
한번 실행해보겠습니다.
예쁘게 나온 것을 확인할 수 있습니다.
- 파일 선택 기능 구현
이제 로고를 탭하면 비디오와 사진을 선택할 수 있는 기능을 구현해보겠습니다. _Logo 위젯에 GestureDetector를 추가해서 onTap() 함수가 실행됐을때 동영상을 선택하는 함수로 구현하겠습니다.
import 'package:flutter/material.dart';
import 'package:image_picker/image_picker.dart';

class HomeScreen extends StatefulWidget{
  const HomeScreen({Key? key}) : super(key: key);

  @override
  State<HomeScreen> createState() => _HomeScreenState();
}

class _HomeScreenState extends State<HomeScreen>{
  XFile? video; //동영상 저장 변수

  @override
  Widget build(BuildContext context){
    return Scaffold(
      backgroundColor: Colors.black,

      //동영상 선택에 따른 함수 실행
      body: video == null ? renderEmpty() : renderVideo(),
    );
  }

  //동영상이 없을때 보여주는 함수
  Widget renderEmpty(){
    return Container(
      width: MediaQuery.of(context as BuildContext).size.width,
      decoration: getBoxDecoration(), //함수로부터 값 가져오기

      child: Column(
        mainAxisAlignment: MainAxisAlignment.center,
        children: [
          _Logo(
            onTap: onNewVideoPress //로고 탭하면 실행하는 함수
          ), //로고 이미지
          SizedBox(height: 30.0,),
          _AppName(), //앱 이름
        ],
      ),
    );
  }

  //tap하면 실행되는 함수
  void onNewVideoPress() async{
    final video = await ImagePicker().pickVideo(source: ImageSource.gallery,);

    if(video != null){
      setState(() {
        this.video = video;
      });
    }
  }
  //데코레이션box 반환 함수
  BoxDecoration getBoxDecoration(){
    return BoxDecoration(
      gradient: LinearGradient(
        begin: Alignment.topCenter,
        end: Alignment.bottomCenter,
        colors: [
          Color(0xFF2A4A7C),
          Color(0xFF000118)

        ]
      )
    );
  }

//동영상이 있을때 보여주는 함수
  Widget renderVideo(){
    return Container();
  }
}

//로고 클래스
class _Logo extends StatelessWidget{

  final GestureTapCallback onTap;

  const _Logo({required this.onTap, Key? key}) : super(key: key);

  @override
  Widget build(BuildContext context){
    return GestureDetector( //제스처 디텍터로 변경
      onTap: onTap,
      child: Image.asset('asset/img/logo.png'),
    );
  }
}

//앱 이름
class _AppName extends StatelessWidget{
  const _AppName({Key? key}) : super(key : key);

  @override
  Widget build(BuildContext context){
    final textStyle = TextStyle(
        color: Colors.white,
        fontSize: 30.0,
        fontWeight: FontWeight.w300);

    return Row(
      mainAxisAlignment: MainAxisAlignment.center, //글자 가운데 정렬
      children: [
        Text("VIDEO",
          style: textStyle,),
        Text("PLAYER",
          style: textStyle.copyWith(

            //두께만 700으로 변경
              fontWeight: FontWeight.w700
          ),)
      ],
    );
  }

}
- 동영상 재생기 구현
실제로 동영상을 재생하는 위젯을 만들게습니다. renderVideo() 함수는 custom_video_player.dart 파일로부터 CustomVideoPlayer클래스(위젯)을 받아와서 렌더링 하게 만들 것입니다. custom_video_player.dart은 lib/component 폴더에 넣겠습니다. 없으면 생성하면됩니다. 아래는 custom_video_player.dart입니다.
import 'package:flutter/material.dart';
import 'package:image_picker/image_picker.dart';

class CustomVideoPlayer extends StatefulWidget{

  //선택할 동영상을 저장할 변수
  final XFile video;

  const CustomVideoPlayer({required this.video, Key? key}) : super(key : key);

  @override
  State<CustomVideoPlayer> createState() => _CustomVideoPlayerState();
}

class _CustomVideoPlayerState extends State<CustomVideoPlayer> {
  @override
  Widget build(BuildContext context){
    return Center(
    child: Text(
    "CustomVideoPlayer",
    style: TextStyle(
      color: Colors.white
      ),
    ));
  }
}
이제 이 위젯을 홈화면에 적용하겠습니다. 아래는 home_screen.dart 파일의 일부입니다.
//동영상이 있을때 보여주는 함수
  Widget renderVideo(){
    return Center(
      child: CustomVideoPlayer(
        video: video!,
      ),
    );
  }
}
한번 실행해보겠습니다.
아이콘 클릭후 영상을 클릭하면 화면이 잘 전환되는 것을 확인할 수 있습니다.
- 영상 플레이어 위젯 기능 개선
이제 영상 플레이어에 받아온 video 영상을 출력하고 컨트롤러를 세팅해보겠습니다.
import 'package:flutter/material.dart';
import 'package:image_picker/image_picker.dart';
import 'package:video_player/video_player.dart';
import 'dart:io'; //파일 관련 패키지

class CustomVideoPlayer extends StatefulWidget{

  //선택할 동영상을 저장할 변수
  final XFile video;

  const CustomVideoPlayer({required this.video, Key? key}) : super(key : key);

  @override
  State<CustomVideoPlayer> createState() => _CustomVideoPlayerState();
}

class _CustomVideoPlayerState extends State<CustomVideoPlayer> {

  VideoPlayerController? videoController; //영상 조작 컨트롤러

  @override
  void initState() {
    super.initState();

    initializeController(); //컨트롤러 세팅
  }

  //파일 경로를
  initializeController() async{
    final videoController = VideoPlayerController.file(
      File(widget.video.path) //전달된 비디오 path로 비디오 재생
    );
  }

  @override
  Widget build(BuildContext context){

    if(videoController == null){ //영상이 없을때 로딩중 표시
      return Center(
        child: CircularProgressIndicator(),
      );
    }

    return AspectRatio(aspectRatio: //동영상 비율에 따른 화면 렌더링
    videoController!.value.aspectRatio,
        child: VideoPlayer(videoController!,)
    );
  }
}
한번 실행해보겠습니다.

파일 선택후 잘 나옵니다.
- Slider 위젯 동영상과 연동
이제 Slider 위젯을 영상에 연동하겠습니다. 일단 슬라이더만 올려놓곘습니다.
import 'package:flutter/material.dart';
import 'package:image_picker/image_picker.dart';
import 'package:video_player/video_player.dart';
import 'dart:io'; //파일 관련 패키지

class CustomVideoPlayer extends StatefulWidget{

  //선택할 동영상을 저장할 변수
  final XFile video;

  const CustomVideoPlayer({required this.video, Key? key}) : super(key : key);

  @override
  State<CustomVideoPlayer> createState() => _CustomVideoPlayerState();
}

class _CustomVideoPlayerState extends State<CustomVideoPlayer> {

  VideoPlayerController? videoController; //영상 조작 컨트롤러

  @override
  void initState() {
    super.initState();

    initializeController(); //컨트롤러 세팅
  }

  //파일 경로를
  initializeController() async{
    final videoController = VideoPlayerController.file(
      File(widget.video.path) //전달된 비디오 path로 비디오 재생
    );

    await videoController.initialize();

    setState(() {
      this.videoController = videoController;
    });
  }

  @override
  Widget build(BuildContext context){

    if(videoController == null){ //영상이 없을때 로딩중 표시
      return Center(
        child: CircularProgressIndicator(),
      );
    }

    return AspectRatio(aspectRatio: //동영상 비율에 따른 화면 렌더링
    videoController!.value.aspectRatio,
        child: Stack(
          children: [
          VideoPlayer(videoController!,),
          Positioned(
            bottom: 0, //아래로부터 0
            right: 0, //오른쪽으로부터 0
            left: 0,  //왼쪽으로부터 0
            child: Slider(
            onChanged: (double val){},
            value: 0,
            min: 0,
            max: videoController!.value.duration.inSeconds.toDouble(),
        )
    )]
        )
    );
  }
}
슬라이더가 나왔습니다.
- 동영상 컨트롤 버튼 구현
이제 뒤로가기, 재생/멈춤, 앞으로가기 버튼을 구현해보겠습니다. 버튼은 CustomIconButton위젯으로 구현하겠습니다. 이는 component폴더 아래에 구현하겠습니다.
import 'package:flutter/material.dart';

class CustomIconButton extends StatelessWidget {
  final GestureTapCallback onPressed;  // ➊ 아이콘을 눌렀을 때 실행할 함수
  final IconData iconData;  // ➋ 아이콘

  const CustomIconButton({
    required this.onPressed,
    required this.iconData,
    Key? key,
  }) : super(key: key);

  @override
  Widget build(BuildContext context) {
    return IconButton(  // 아이콘을 버튼으로 만들어주는 위젯
      onPressed: onPressed,  // 아이콘을 눌렀을 때 실행할 함수
      iconSize: 30.0,   // 아이콘 크기
      color: Colors.white,   // 아이콘 색상
      icon: Icon(       // 아이콘
        iconData,
      ),
    );
  }
}
이제 이를 활용해서 비디오 플레이어에 버튼을 넣어보겠습니다.
- 완성본
import 'package:flutter/material.dart';
import 'package:image_picker/image_picker.dart';
import 'package:video_player/video_player.dart';
import 'dart:io';
import 'package:vid_player/component/custom_icon_button.dart';

// ➊ 동영상 위젯 생성
class CustomVideoPlayer extends StatefulWidget {
  // 선택한 동영상을 저장할 변수
  final XFile video;
  final GestureTapCallback onNewVideoPressed;

  const CustomVideoPlayer({
    required this.video, // 상위에서 선택한 동영상 주입해주기
    required this.onNewVideoPressed,
    Key? key,
  }) : super(key: key);

  @override
  State<CustomVideoPlayer> createState() => _CustomVideoPlayerState();
}

class _CustomVideoPlayerState extends State<CustomVideoPlayer> {
  VideoPlayerController? videoController;
  bool showControls = false;

  @override
  // covariant 키워드는 CustomVideoPlayer 클래스의 상속된 값도 허가해줍니다.
  void didUpdateWidget(covariant CustomVideoPlayer oldWidget) {
    super.didUpdateWidget(oldWidget);

    // ➊ 새로 선택한 동영상이 같은 동영상인지 확인
    if (oldWidget.video.path != widget.video.path) {
      initializeController();
    }
  }

  @override
  void initState() {
    super.initState();

    initializeController(); // ➋ 컨트롤러 초기화
  }

  initializeController() async {
    // ➌ 선택한 동영상으로 컨트롤러 초기화
    final videoController = VideoPlayerController.file(
      File(widget.video.path),
    );

    await videoController.initialize();

    videoController.addListener(videoControllerListener);

    setState(() {
      this.videoController = videoController;
    });
  }

  void videoControllerListener() {
    setState(() {});
  }

  @override
  void dispose() {
    // ➋ listener 삭제
    videoController?.removeListener(videoControllerListener);
    super.dispose();
  }

  @override
  Widget build(BuildContext context) {
    if (videoController == null) {
      return Center(
        child: CircularProgressIndicator(),
      );
    }

    return GestureDetector(
      // ➋ 화면 전체의 탭을 인식하기 위해 사용
      onTap: () {
        setState(() {
          showControls = !showControls;
        });
      },
      child: AspectRatio(
        aspectRatio: videoController!.value.aspectRatio,
        child: Stack(
          // ➊ children 위젯을 위로 쌓을 수 있는 위젯
          children: [
            VideoPlayer(
              // VideoPlayer 위젯을 Stack으로 이동
              videoController!,
            ),
            if(showControls)
              Container(  // ➌ 아이콘 버튼을 보일 때 화면을 어둡게 변경
                color: Colors.black.withOpacity(0.5),
              ),
            Positioned(
              bottom: 0,
              left: 0,
              right: 0,
              child: Padding(
                padding: EdgeInsets.symmetric(horizontal: 8.0),
                child: Row(
                  children: [
                    renderTimeTextFromDuration(
                      // 동영상 현재 위치
                      videoController!.value.position,
                    ),
                    Expanded(
                      // Slider가 남는 공간을 모두 차지하도록 구현
                      child: Slider(
                        onChanged: (double val) {
                          videoController!.seekTo(
                            Duration(seconds: val.toInt()),
                          );
                        },
                        value: videoController!.value.position.inSeconds
                            .toDouble(),
                        min: 0,
                        max: videoController!.value.duration.inSeconds
                            .toDouble(),
                      ),
                    ),
                    renderTimeTextFromDuration(
                      // 동영상 총 길이
                      videoController!.value.duration,
                    ),
                  ],
                ),
              ),
            ),
            if(showControls)
              Align(
                // ➊ 오른쪽 위에 새 동영상 아이콘 위치
                alignment: Alignment.topRight,
                child: CustomIconButton(
                  onPressed: widget.onNewVideoPressed,
                  iconData: Icons.photo_camera_back,
                ),
              ),
            if (showControls)
              Align(
                // ➋ 동영상 재생관련 아이콘 중앙에 위치
                alignment: Alignment.center,
                child: Row(
                  mainAxisAlignment: MainAxisAlignment.spaceEvenly,
                  children: [
                    CustomIconButton(
                      // 되감기 버튼
                      onPressed: onReversePressed,
                      iconData: Icons.rotate_left,
                    ),
                    CustomIconButton(
                      // 재생 버튼
                      onPressed: onPlayPressed,
                      iconData: videoController!.value.isPlaying
                          ? Icons.pause
                          : Icons.play_arrow,
                    ),
                    CustomIconButton(
                      // 앞으로 감기 버튼
                      onPressed: onForwardPressed,
                      iconData: Icons.rotate_right,
                    ),
                  ],
                ),
              ),
          ],
        ),
      ),
    );
  }

  Widget renderTimeTextFromDuration(Duration duration) {
    return Text(
      '${duration.inMinutes.toString().padLeft(2, '0')}:${(duration.inSeconds % 60).toString().padLeft(2, '0')}',
      style: TextStyle(
        color: Colors.white,
      ),
    );
  }

  void onReversePressed() {
    // ➊ 되감기 버튼 눌렀을 때 실행할 함수
    final currentPosition = videoController!.value.position; // 현재 실행 중인 위치

    Duration position = Duration(); // 0초로 실행 위치 초기화

    if (currentPosition.inSeconds > 3) {
      // 현재 실행위치가 3초보다 길때만 3초 빼기
      position = currentPosition - Duration(seconds: 3);
    }

    videoController!.seekTo(position);
  }

  void onForwardPressed() {
    // ➋ 앞으로 감기 버튼 눌렀을 때 실행할 함수
    final maxPosition = videoController!.value.duration; // 동영상 길이
    final currentPosition = videoController!.value.position;

    Duration position = maxPosition; // 동영상 길이로 실행 위치 초기화

    // 동영상 길이에서 3초를 뺀 값보다 현재 위치가 짧을 때만 3초 더하기
    if ((maxPosition - Duration(seconds: 3)).inSeconds >
        currentPosition.inSeconds) {
      position = currentPosition + Duration(seconds: 3);
    }

    videoController!.seekTo(position);
  }

  void onPlayPressed() {
    // ➌ 재생 버튼을 눌렀을 때 실행할 함수
    if (videoController!.value.isPlaying) {
      videoController!.pause();
    } else {
      videoController!.play();
    }
  }
}'Programming > Flutter' 카테고리의 다른 글
| Flutter 프로그래밍 - 10(코팩 튜브) (0) | 2024.01.20 |
|---|---|
| Flutter 프로그래밍 - 9(포토 스티커) (0) | 2024.01.16 |
| Flutter 프로그래밍 - 7(디지털 주사위) (1) | 2024.01.13 |
| Flutter 프로그래밍 - 6(만난지 며칠 앱 만들기) (0) | 2024.01.08 |
| Flutter 프로그래밍 - 5(전자액자 만들기) (0) | 2024.01.07 |


