
외로운 Nova의 작업실
안드로이드 앱 프로그래밍 - 13(제트팩 라이브러리 - 프래그먼트) 본문
- 프래그먼트
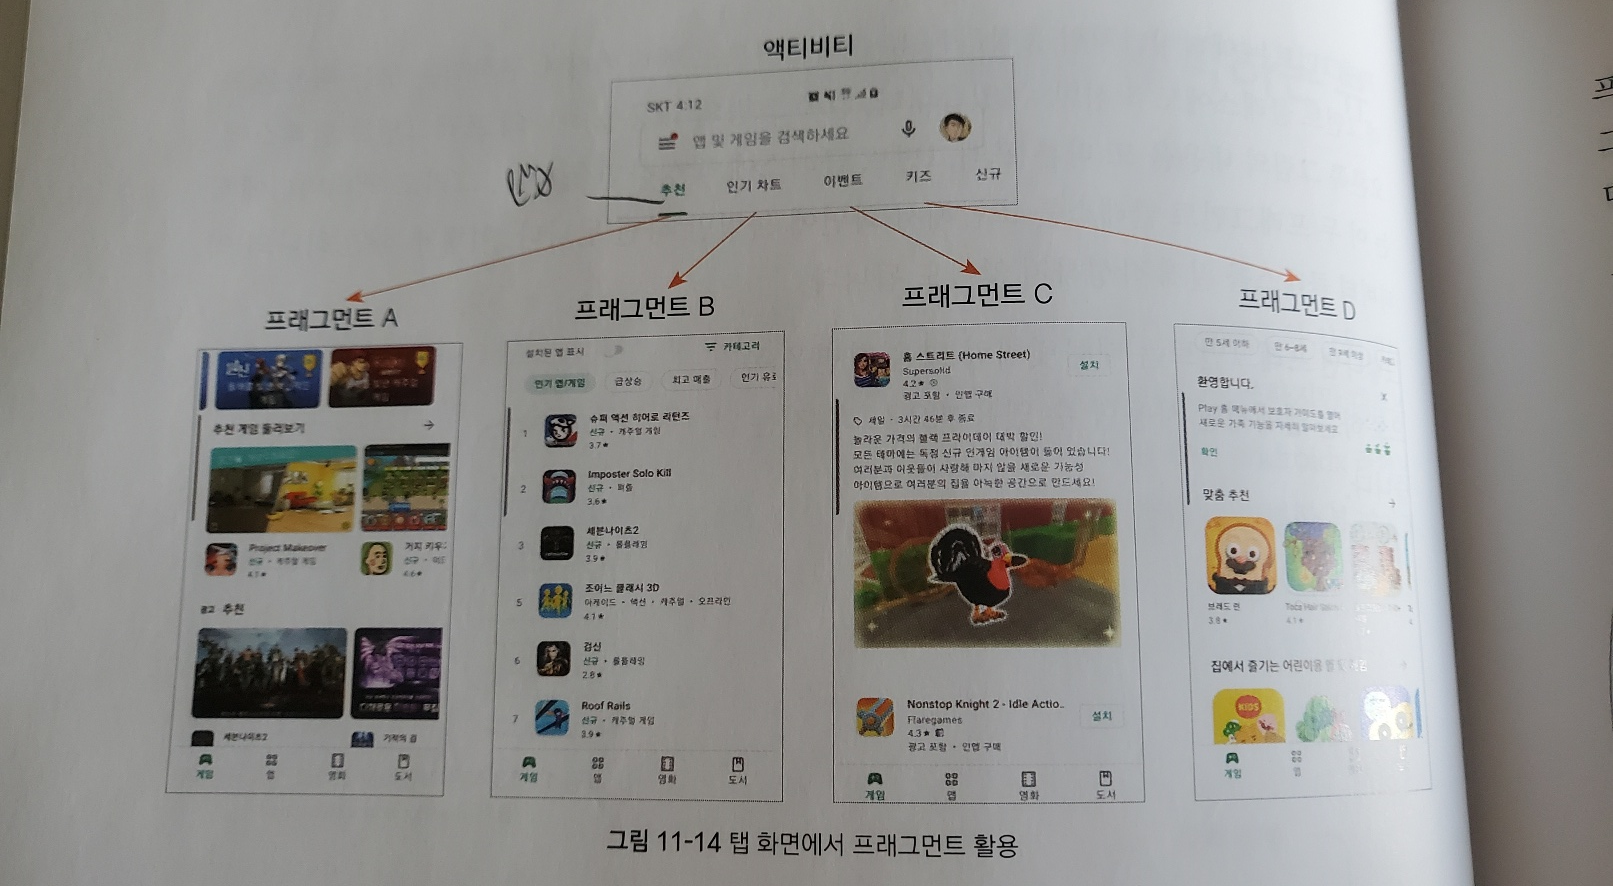
프래그먼트란 액티비티 화면을 구성하는 뷰입니다. 프래그먼트가 다른 뷰와 다른점은 액티비티 처럼 동작한다는 것입니다. 프래그먼트는 아래와 같이 사용됩니다.
프래그먼트는 아래와 같이 구현됩니다.

- 프래그먼트 구현
먼저 프래그먼트를 사용하겠다고 그리들 파일에 선언해줘야합니다.
dependencies {

    ...
    implementation 'androidx.fragment:fragment-ktx:1.5.5'

}
이제 프래그먼트를 만들어보겠습니다. 프래그먼트의 xml을 먼저 만들어주겠습니다. 아래는 fragement1.xml입니다.
<?xml version="1.0" encoding="utf-8"?>
<androidx.constraintlayout.widget.ConstraintLayout xmlns:android="http://schemas.android.com/apk/res/android"
    xmlns:app="http://schemas.android.com/apk/res-auto"
    xmlns:tools="http://schemas.android.com/tools"
    android:layout_width="match_parent"
    android:layout_height="match_parent"
    tools:context=".MainActivity">
    <LinearLayout
        android:id="@+id/fragement_content"
        android:layout_width="match_parent"
        android:layout_height="match_parent"
        android:orientation="vertical"
        app:layout_constraintBottom_toTopOf="parent">
        <fragment
            android:layout_width="wrap_content"
            android:layout_height="wrap_content"
            android:id="@+id/fragemtView"
            android:name="com.example.stopwatch.OneFragement"/>
    </LinearLayout>
</androidx.constraintlayout.widget.ConstraintLayout>
위와 같은 프래그먼트를 2개 더 만들어 줍니다. 이름은 fragment2.xml fragement3.xml입니다.
<?xml version="1.0" encoding="utf-8"?>
<androidx.constraintlayout.widget.ConstraintLayout xmlns:android="http://schemas.android.com/apk/res/android"
    xmlns:app="http://schemas.android.com/apk/res-auto"
    xmlns:tools="http://schemas.android.com/tools"
    android:layout_width="match_parent"
    android:layout_height="match_parent">

    <TextView
        android:id="@+id/textView"
        android:layout_width="wrap_content"
        android:layout_height="wrap_content"
        android:text="Fragment2"
        android:textColor="#FFFFFF"
        android:textSize="30dp"
        app:layout_constraintBottom_toBottomOf="parent"
        app:layout_constraintEnd_toEndOf="parent"
        app:layout_constraintStart_toStartOf="parent"
        app:layout_constraintTop_toTopOf="parent" />
</androidx.constraintlayout.widget.ConstraintLayout>
<?xml version="1.0" encoding="utf-8"?>
<androidx.constraintlayout.widget.ConstraintLayout xmlns:android="http://schemas.android.com/apk/res/android"
xmlns:app="http://schemas.android.com/apk/res-auto"
xmlns:tools="http://schemas.android.com/tools"
android:layout_width="match_parent"
android:layout_height="match_parent">
<TextView
android:id="@+id/textView"
android:layout_width="wrap_content"
android:layout_height="wrap_content"
android:text="Fragment3"
android:textColor="#FFFFFF"
app:layout_constraintBottom_toBottomOf="parent"
app:layout_constraintEnd_toEndOf="parent"
app:layout_constraintStart_toStartOf="parent"
app:layout_constraintTop_toTopOf="parent"
android:textSize="30dp"/>
</androidx.constraintlayout.widget.ConstraintLayout>이제 프래그먼트를 화면에 띄우는 kt파일을 만들어줍니다. 아래는 fragementOne.kt파일입니다.
package com.example.test
import android.os.Bundle
import android.view.LayoutInflater
import android.view.View
import android.view.ViewGroup
import androidx.fragment.app.Fragment

class fragementOne : Fragment() {

    override fun onCreateView(inflater: LayoutInflater, container: ViewGroup?, savedInstanceState: Bundle?
    ): View? {

        val view = inflater.inflate(R.layout.fragement1, container, false)

        return view
    }
}
이제 이걸 2개더 만들어 줍니다. 각각 fragement2.xml과 fragement3.xml을 화면에 띄워주는 kt파일입니다. 이름은 fragementTwo.kt fragmentThree.kt 입니다.
//fragemetTwo.kt
package com.example.test
import android.os.Bundle
import android.view.LayoutInflater
import android.view.View
import android.view.ViewGroup
import androidx.fragment.app.Fragment

class fragementTwo : Fragment() {

    override fun onCreateView(inflater: LayoutInflater, container: ViewGroup?, savedInstanceState: Bundle?
    ): View? {

        val view = inflater.inflate(R.layout.fragement2, container, false)

        return view
    }
}

//fragementThree.kt
package com.example.test
import android.os.Bundle
import android.view.LayoutInflater
import android.view.View
import android.view.ViewGroup
import androidx.fragment.app.Fragment

class fragementThree : Fragment() {

    override fun onCreateView(inflater: LayoutInflater, container: ViewGroup?, savedInstanceState: Bundle?
    ): View? {

        val view = inflater.inflate(R.layout.fragement3, container, false)

        return view
    }
}
이제 메인 액티비티파일에 프래그먼트를 바꿀 수 있는 버튼과 프래그먼트가 들어갈 자리를 framelayout태그로 만들어줍니다.
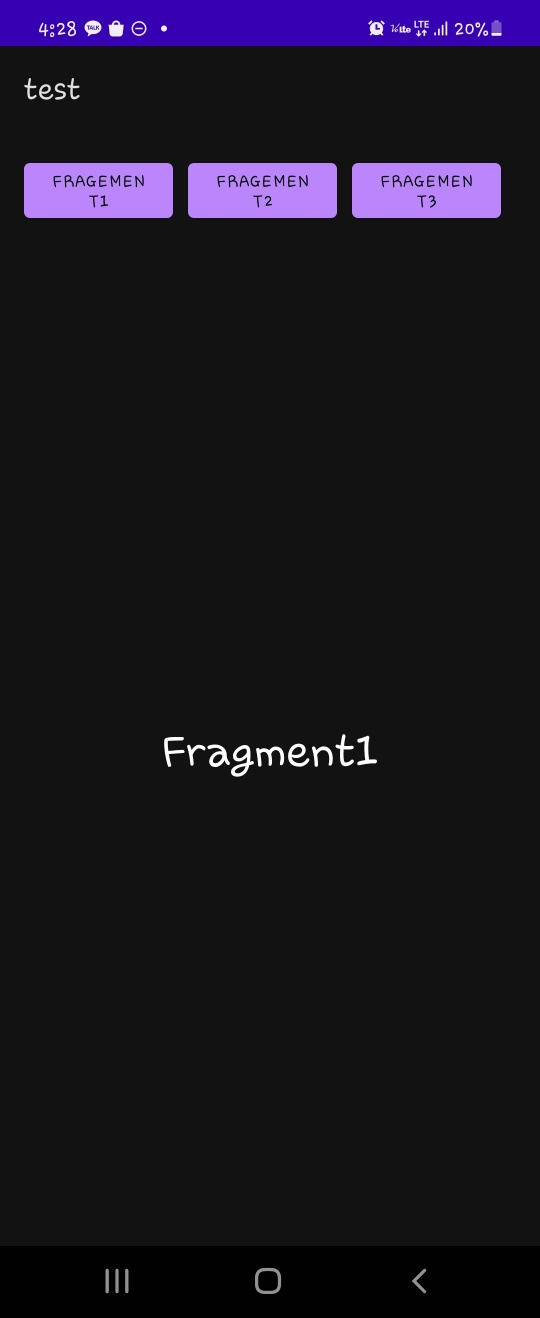
<?xml version="1.0" encoding="utf-8"?>
<LinearLayout xmlns:android="http://schemas.android.com/apk/res/android"
    xmlns:app="http://schemas.android.com/apk/res-auto"
    xmlns:tools="http://schemas.android.com/tools"
    android:layout_width="match_parent"
    android:layout_height="match_parent"
    tools:context=".MainActivity"
    android:orientation="vertical">

    <LinearLayout
        android:layout_width="match_parent"
        android:layout_height="wrap_content"
        android:orientation="horizontal"
        android:layout_margin="16dp">

        <Button
            android:id="@+id/btn_fragment1"
            android:layout_width="match_parent"
            android:layout_height="wrap_content"
            android:text="fragement1"
            android:layout_weight="1"
            android:layout_marginRight="10dp"/>
        <Button
            android:id="@+id/btn_fragment2"
            android:layout_width="match_parent"
            android:layout_height="wrap_content"
            android:text="fragement2"
            android:layout_weight="1"
            android:layout_marginRight="10dp"/>
        <Button
            android:id="@+id/btn_fragment3"
            android:layout_width="match_parent"
            android:layout_height="wrap_content"
            android:text="fragement3"
            android:layout_weight="1"
            android:layout_marginRight="10dp"/>
    </LinearLayout>

    <FrameLayout
        android:layout_width="match_parent"
        android:layout_height="match_parent"
        android:id="@+id/main_fragment"
        android:layout_margin="16dp"/>

</LinearLayout>
이제 메인액티비티.kt에 supportFrameManage를 사용해서 프레임을 삽입해주고 버튼클릭시 프레임을 바꿔주는 코드를 작성합니다.
package com.example.test

import androidx.appcompat.app.AppCompatActivity
import android.os.Bundle
import com.example.test.databinding.ActivityMainBinding

class MainActivity : AppCompatActivity() {
    override fun onCreate(savedInstanceState: Bundle?) {
        super.onCreate(savedInstanceState)
        val binding = ActivityMainBinding.inflate(layoutInflater) //activity_main_xml 파일의 객체들을 가져옵니다.

        setContentView(binding.root) //activity_main_xml을 화면에 출력합니다.

        setFragment(0) //초기 화면

        //버튼 눌렀을때 프래그먼트 변환
        binding.btnFragment1.setOnClickListener(){
            setFragment(0)
        }
        binding.btnFragment2.setOnClickListener(){
            setFragment(1)
        }
        binding.btnFragment3.setOnClickListener(){
            setFragment(2)
        }

    }

    //프레그먼트 교체해주는 함수
    private fun setFragment(FrageNum: Int) {
        var manage = supportFragmentManager.beginTransaction()

        when(FrageNum){
            0 -> {
                manage.replace(R.id.main_fragment, fragementOne()).commit()
            }

            1 -> {
                manage.replace(R.id.main_fragment, fragementTwo()).commit()
            }
            2 -> {
                manage.replace(R.id.main_fragment, fragementThree()).commit()
            }
        }
    }
}
이때 transaction의 함수의 종류는 아래와 같습니다.
- add(int contatinerViewId, Fragement fragment) : 새로운 프래그먼트를 화면에 추가합니다.
- replace(int containerViewId, Fragement fragement) : 추가된 프래그먼트를 대체합니다.
- remove(Fragement fragement) : 추가된 프래그먼트를 제거합니다.
- commit() : 화면에 적용합니다.
실행시에는 아래와 같습니다.
-프래그먼트 생명주기
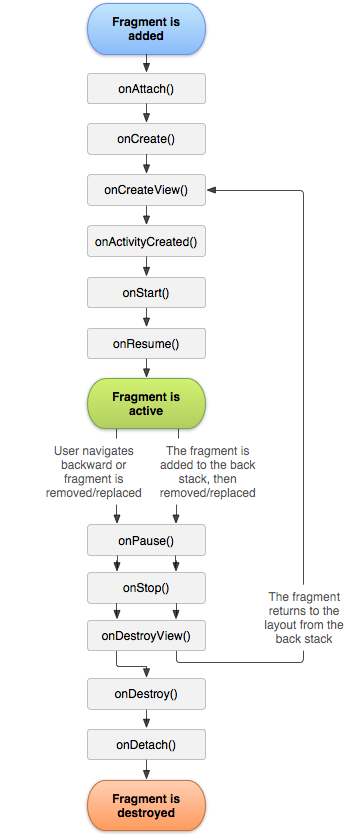
프래그먼트의 생명주기를 사용하는 이유는 백스택 즉 뒤로가기 버튼을 위해서입니다. 만약 백스택을 사용한다면 onDestoryView()를 기점으로 잠시 사라지지않고 머물렀다가 뒤로가기를 누르면 다시 호출합니다. 하지만 백스택을 사용하지않습니다. onDestoryView()를 지나 onDetach()가 실행되어 아예 사라지게됩니다. 백스택을 사용하는 방법은 아래 코드를 메인액티비티에 추가해주면됩니다.
transaction.addToBackStack(null)
'Programming > Kotlin - Android' 카테고리의 다른 글
| 안드로이드 앱 프로그래밍 - 15(제트팩 라이브러리 - 뷰페이저2) (0) | 2023.01.20 |
|---|---|
| 안드로이드 앱 프로그래밍 - 14(제트팩 라이브러리 - 리사이클러뷰) (0) | 2023.01.19 |
| 안드로이드 앱 프로그래밍 - 12(제트팩 라이브러리 - appcompat) (0) | 2023.01.18 |
| 안드로이드 앱 프로그래밍 - 11(소리와 진동알림, 알림) (0) | 2023.01.17 |
| 안드로이드 앱 프로그래밍 - 10(다양한 다이얼로그) (0) | 2023.01.17 |


