외로운 Nova의 작업실
Flutter 프로그래밍 - 11(일정 관리 앱) 본문
안녕하세요, 이번시간에는 일정 관리 앱을 만들고 12, 13, 14장을 지나며 로컬 DB, 원격 DB, 파이어베이스등을 이용해보는 과정을 학습해보도록 하겠습니다.
- 프로젝트 구상

- 사전 지식
이번에 사용해볼 tale_calendar 플러그인은 달력을 쉽게 구현할 수 있도록 해주는 플러그인입니다. 직접 달력을 구현할 수 도 있겠지만 시간이 너무 오래걸리니 잘 개발되어있는 오픈소스를 이용해서 달력 기능을 구현해보겠습니다.
- 사전 준비
프로젝트 이름 : calendar_schedular
이제 pubspec.yaml을 설정해보겠습니다. 이때 플러그인을 추가할 수 있는 키값은 dependencies말고도 dev_dependencies가 하나더 있습니다. 전자는 빌드할때 앱에 함께 패키징 되지만 dev_dependencies에 입력되는 플러그인은 개발할때만 사용되고 앱과 함께 패키징 되지않습니다. 결론적으로 쿼리구문을 생성하거나 무언가 개발할때만 필요한 플러그인을 dev_dependencies에 적으면됩니다.
드리프트는 클래스를 이용해서 SQLite 데이터베이스를 구현할 수 있는 플러그인입니다. 직접 SQL 쿼리를 작성하지 않아도 다트 언어로 데이터베이스 테이블과 쿼리를 구현하면 드리프트가 자동으로 쿼리를 생성해줍니다. 이렇게 자동으로 코드를 작성하는 기능을 플러터에서는 코드 생성이라고 부릅니다. 이 코드 생성은 데이터베이스 관련 코드가 변경될때마다 한번씩만 실행해주면 되기 때문에 앱과 함께 패키징될 필요가 없습니다. 따라서 dev_dependencies에 드리프트 코드 생성 관련 플러그인을 추가하면됩니다. 실제 pubspec.yaml 파일을 작성해보겠습니다.
name: calendar_shedular
description: "A new Flutter project."
# The following line prevents the package from being accidentally published to
# pub.dev using `flutter pub publish`. This is preferred for private packages.
publish_to: 'none' # Remove this line if you wish to publish to pub.dev

# The following defines the version and build number for your application.
# A version number is three numbers separated by dots, like 1.2.43
# followed by an optional build number separated by a +.
# Both the version and the builder number may be overridden in flutter
# build by specifying --build-name and --build-number, respectively.
# In Android, build-name is used as versionName while build-number used as versionCode.
# Read more about Android versioning at https://developer.android.com/studio/publish/versioning
# In iOS, build-name is used as CFBundleShortVersionString while build-number is used as CFBundleVersion.
# Read more about iOS versioning at
# https://developer.apple.com/library/archive/documentation/General/Reference/InfoPlistKeyReference/Articles/CoreFoundationKeys.html
# In Windows, build-name is used as the major, minor, and patch parts
# of the product and file versions while build-number is used as the build suffix.
version: 1.0.0+1

environment:
  sdk: '>=3.2.4 <4.0.0'

# Dependencies specify other packages that your package needs in order to work.
# To automatically upgrade your package dependencies to the latest versions
# consider running `flutter pub upgrade --major-versions`. Alternatively,
# dependencies can be manually updated by changing the version numbers below to
# the latest version available on pub.dev. To see which dependencies have newer
# versions available, run `flutter pub outdated`.
dependencies:
  flutter:
    sdk: flutter


  # The following adds the Cupertino Icons font to your application.
  # Use with the CupertinoIcons class for iOS style icons.
  cupertino_icons: ^1.0.2
  table_calendar: 3.0.7 #달력 기능을 제공하는 플러그인
  intl: 0.17.0 #다국어화 기능을 제공하는 플러그인
  drift: 2.1.0 #Drift 플러그인
  sqlite3_flutter_libs: 0.5.10 #SQLite 플러그인
  path_provider: 2.0.11 #경로 관련 기능을 제공하는 플러그인
  path: ^1.8.3 #경로 관련 기능을 제공하는 플러그인
  get_it: 7.2.0 #프로젝트 전역으로 의존성 주입을 가능하게 하는 플러그인
  dio: 4.0.6 #네트워크 요청을 가능하게 하는 플러그인
  provider: 6.0.3 #상태관리를 가능하게 하는 플러그인
  uuid: 3.0.6 #UUID를 생성하는 플러그인

dev_dependencies:
  flutter_test:
    sdk: flutter

  # The "flutter_lints" package below contains a set of recommended lints to
  # encourage good coding practices. The lint set provided by the package is
  # activated in the `analysis_options.yaml` file located at the root of your
  # package. See that file for information about deactivating specific lint
  # rules and activating additional ones.
  flutter_lints: ^2.0.0
  drift_dev: 2.1.0 #Drift 코드 생성 기능 관련 플러그인
  build_runner: 2.2.0 #코드생성 기능을 제공하는 플러그인

# For information on the generic Dart part of this file, see the
# following page: https://dart.dev/tools/pub/pubspec

# The following section is specific to Flutter packages.
flutter:

  # The following line ensures that the Material Icons font is
  # included with your application, so that you can use the icons in
  # the material Icons class.
  uses-material-design: true

  # To add assets to your application, add an assets section, like this:
  # assets:
  #   - images/a_dot_burr.jpeg
  #   - images/a_dot_ham.jpeg

  # An image asset can refer to one or more resolution-specific "variants", see
  # https://flutter.dev/assets-and-images/#resolution-aware

  # For details regarding adding assets from package dependencies, see
  # https://flutter.dev/assets-and-images/#from-packages

  # To add custom fonts to your application, add a fonts section here,
  # in this "flutter" section. Each entry in this list should have a
  # "family" key with the font family name, and a "fonts" key with a
  # list giving the asset and other descriptors for the font. For
  # example:
  # fonts:
  #   - family: Schyler
  #     fonts:
  #       - asset: fonts/Schyler-Regular.ttf
  #       - asset: fonts/Schyler-Italic.ttf
  #         style: italic
  #   - family: Trajan Pro
  #     fonts:
  #       - asset: fonts/TrajanPro.ttf
  #       - asset: fonts/TrajanPro_Bold.ttf
  #         weight: 700
  #
  # For details regarding fonts from package dependencies,
  # see https://flutter.dev/custom-fonts/#from-packages
- 프로젝트 초기화
늘 했던것처럼 screen/home_screen.dart 파일을 만들겠습니다.
import 'package:flutter/material.dart';

class HomeScreen extends StatelessWidget{
  const HomeScreen({Key? key}) : super(key: key);

  @override
  Widget build(BuildContext context){
    return Scaffold(
      body: Text('Home Screen'),
    );
  }
}
이제 이걸 main.dart에 적용해주겠습니다.
import 'package:flutter/material.dart';
import 'package:calendar_shedular/screen/home_screen.dart';

void main() {
  runApp(
    MaterialApp(
      home: HomeScreen(),
    )
  );
}
- 레이아웃 구상하기
홈스크린은 달력과 리스트로 2등분된 형태입니다. 가운데에는 일정 개수 배너가 있고 위에는 달력이 아래는 일정 리스트가 나타납니다. 마지막으로 플로팅 액션버튼으로 구현한 일정 추가 버튼이 있습니다. 이버튼을 누르면 새로운 일정을 생성하는 화면을 띄울 수 있습니다.

플로팅 버튼을 누르면 ScheduleBottomSheet를 띄워서 일정을 추가하거나 수정할때 사용하겠습니다. BottomSheet는 아직 배우지않았지만 U&I 작업에서 사용했던 다이얼로그와 매우 비슷합니다. ScheduleBottomSheet는 텍스트 필드와 저장버튼으로 이루어져있습니다.
- 구현하기
먼저 프로젝트에서 사용할 색상을 lib/cons/colors.dart파일에 지정하겠습니다.
import 'package:flutter/material.dart';

const PRIMARY_COLOR = Color(0xFF0DB2B2);
final LIGHT_GREY_COLOR = Colors.grey[200]!;
final DARK_GREY_COLOR = Colors.grey[600]!;
final TEXT_FIELD_FILL_COLOR = Colors.grey[300]!;
- 달력 구현하기
이제 달력을 MainCalendar 클래스로 lib/component/main_calander.dart파일에 만들겠습니다.
import 'package:flutter/material.dart';
import 'package:table_calendar/table_calendar.dart';

class MainCalander extends StatelessWidget{

  @override
  Widget build(BuildContext context){

    return TableCalendar(
        focusedDay: DateTime.now(), //현재 달력 위치
        firstDay: DateTime(1800, 1, 1), //달력의 처음 날짜
        lastDay: DateTime(3000, 1, 1) //달력의 마지막 날짜
    );
  }
}
이제 이걸 예시로 홈스크린에 띄워보겠습니다.
import 'package:flutter/material.dart';
import 'package:calendar_shedular/component/main_calaner.dart';

class HomeScreen extends StatelessWidget{
  const HomeScreen({Key? key}) : super(key: key);

  @override
  Widget build(BuildContext context){
    return Scaffold(
      body: SafeArea(
        child: Column(
          children: [

            MainCalander(),
          ],
        ),
      ),
    );
  }
}
실행해보겠습니다.

잘 나오는 것을 확인할 수 있습니다.
- 달력 꾸미기
이제 달력을 꾸며보도록 하겠습니다.
import 'package:flutter/material.dart';
import 'package:table_calendar/table_calendar.dart';
import 'package:calendar_shedular/const/colors.dart';

class MainCalander extends StatelessWidget{

  @override
  Widget build(BuildContext context){

    return TableCalendar(
        focusedDay: DateTime.now(), //현재 달력 위치
        firstDay: DateTime(1800, 1, 1), //달력의 처음 날짜
        lastDay: DateTime(3000, 1, 1), //달력의 마지막 날짜
        headerStyle: HeaderStyle(
          titleCentered: true, //제목 중앙에 위치하기
          formatButtonVisible: false, //달력 크기 선택 옵션 없애기
          titleTextStyle: TextStyle(
            fontWeight: FontWeight.w700,
            fontSize: 16.0,
          )
        ),

      calendarStyle: CalendarStyle(
        isTodayHighlighted: true,
        defaultDecoration: BoxDecoration( //기본 날짜 스타일
          borderRadius: BorderRadius.circular(6.0),
          color: LIGHT_GREY_COLOR,
        ),

        weekendDecoration: BoxDecoration( //주말 날짜 스타일
          borderRadius: BorderRadius.circular(6.0),
          color: LIGHT_GREY_COLOR,
        ),

        selectedDecoration: BoxDecoration( //선택된 날짜 스타일
          borderRadius: BorderRadius.circular(6.0),
          border: Border.all(
            color: PRIMARY_COLOR,
            width: 1.0
          )
        ),

        defaultTextStyle: TextStyle( //기본 글꼴
          fontWeight: FontWeight.w600,
          color: DARK_GREY_COLOR,
        ),

        weekendTextStyle: TextStyle( //주말 글꼴
          fontWeight: FontWeight.w600,
          color: DARK_GREY_COLOR,
        ),

        selectedTextStyle: TextStyle( //선택된 날짜 글꼴
          fontWeight: FontWeight.w600,
          color: DARK_GREY_COLOR,
        )
      ),
    );
  }
}
실행해보겠습니다.

꾸민대로 잘 나옵니다. 이때 날짜를 선택하면 선택된 날짜로 꾸며진대로 해주기위해 TableCalander 클래스가 HomeScreen 클래스로부터 선택된 날짜와 함수를 받고 그것을 표현해주도록 해보겠습니다. 아래는 main_calander.dart 파일입니다.
import 'package:flutter/material.dart';
import 'package:table_calendar/table_calendar.dart';
import 'package:calendar_shedular/const/colors.dart';

class MainCalander extends StatelessWidget{

  final OnDaySelected onDaySelected;
  final DateTime selectedDate;

  MainCalander({
    required this.onDaySelected,
    required this.selectedDate
  });

  @override
  Widget build(BuildContext context){

    return TableCalendar(
      onDaySelected: onDaySelected, //날짜 선택시 실행할 함수

        selectedDayPredicate: (date) => //선택할 날짜를 구분할 로직
          date.year == selectedDate.year&&
          date.month == selectedDate.month&&
          date.day == selectedDate.day,


        focusedDay: DateTime.now(), //현재 달력 위치
        firstDay: DateTime(1800, 1, 1), //달력의 처음 날짜
        lastDay: DateTime(3000, 1, 1), //달력의 마지막 날짜
        headerStyle: HeaderStyle(
          titleCentered: true, //제목 중앙에 위치하기
          formatButtonVisible: false, //달력 크기 선택 옵션 없애기
          titleTextStyle: TextStyle(
            fontWeight: FontWeight.w700,
            fontSize: 16.0,
          )
        ),

      calendarStyle: CalendarStyle(
        isTodayHighlighted: true,
        defaultDecoration: BoxDecoration( //기본 날짜 스타일
          borderRadius: BorderRadius.circular(6.0),
          color: LIGHT_GREY_COLOR,
        ),

        weekendDecoration: BoxDecoration( //주말 날짜 스타일
          borderRadius: BorderRadius.circular(6.0),
          color: LIGHT_GREY_COLOR,
        ),

        selectedDecoration: BoxDecoration( //선택된 날짜 스타일
          borderRadius: BorderRadius.circular(6.0),
          border: Border.all(
            color: PRIMARY_COLOR,
            width: 1.0
          )
        ),

        defaultTextStyle: TextStyle( //기본 글꼴
          fontWeight: FontWeight.w600,
          color: DARK_GREY_COLOR,
        ),

        weekendTextStyle: TextStyle( //주말 글꼴
          fontWeight: FontWeight.w600,
          color: DARK_GREY_COLOR,
        ),

        selectedTextStyle: TextStyle( //선택된 날짜 글꼴
          fontWeight: FontWeight.w600,
          color: DARK_GREY_COLOR,
        )
      ),
    );
  }
}
이에 맞춰 HomeScreen을 stateful로 만들고 상태에따라 선택하는 날짜를 MainCalander 각각 전달해서 계속 만들내는 방식으로 만들어보겠습니다.
import 'package:flutter/material.dart';
import 'package:calendar_shedular/component/main_calaner.dart';

class HomeScreen extends StatefulWidget{

  const HomeScreen({Key? key}) : super(key: key);

  @override
  State<HomeScreen> createState() => _HomeScreenState();
}

class _HomeScreenState extends State<HomeScreen>{

  DateTime selectedDate = DateTime.utc(
    DateTime.now().year,
    DateTime.now().month,
    DateTime.now().day,
  );

  @override
  Widget build(BuildContext context){
    return Scaffold(
      body: SafeArea(
        child: Column(
          children: [

            MainCalander(selectedDate: selectedDate, onDaySelected: onDaySelected,),
          ],
        ),
      ),
    );
  }

  void onDaySelected(DateTime selectedDate, DateTime focusedDate){

    setState((){
      this.selectedDate = selectedDate;
  });
  }
}
한번 실행해보겠습니다.

잘 선택되는 것을 확인할 수 있습니다.
- 선택된 날의 일정 보여주기
이제 선택된 날의 일정을 ScheduleCard라는 위젯으로 만들고 HomeScreen에 띄워보겠습니다. /lib/component/schedule_card.dart 파일로 만들겠습니다.
import 'package:flutter/material.dart';
import 'package:calendar_shedular/const/colors.dart';

class _Time extends StatelessWidget{
  final int startTime; //시작 시간
  final int endTime; //종료 시간

  const _Time({
    required this.startTime,
    required this.endTime,
    Key? key
}) : super(key: key);

  @override
  Widget build(BuildContext context){
    final textStyle = TextStyle(
      fontWeight: FontWeight.w600,
      color: PRIMARY_COLOR,
      fontSize: 16.0,
    );

    return Column(
      crossAxisAlignment: CrossAxisAlignment.start,
      children: [
        Text(
          '${startTime.toString().padLeft(2, '0')}:00',
          style: textStyle,
        ),

        Text(
          '${endTime.toString().padLeft(2, '0')}:00',
          style: textStyle.copyWith(
            fontSize: 10.0,
          ),
        )
      ],
    );
  }
}

class _Content extends StatelessWidget{
  final String content; //내용

  const _Content({
    required this.content,
    Key? key
  }) : super(key: key);

  @override
  Widget build(BuildContext context){
    return Expanded( //차지할 수 있을만큼 늘리기
      child: Text(
        content
      ),
    );
  }

}

class ScheduleCard extends StatelessWidget{
  final int startTime;
  final int endTime;
  final String content;

  const ScheduleCard({
    required this.startTime,
    required this.endTime,
    required this.content,
    Key? key
}) : super(key: key);

  @override
  Widget build(BuildContext context){
    return Container(
      decoration: BoxDecoration(
        border: Border.all(
          width: 1.0,
          color: PRIMARY_COLOR,
        ),
        borderRadius: BorderRadius.circular(8.0)
      ),

      child: Padding(
        padding: const EdgeInsets.all(16.0),
        child: IntrinsicHeight( //높이를 내부 위젯들의 최대 높이로 설정
          child: Row(
            crossAxisAlignment: CrossAxisAlignment.stretch,
            children: [
              _Time(startTime: startTime, endTime: endTime),
              SizedBox(width: 16.0,),
              _Content(content: content),
              SizedBox(width: 16.0,)
            ],
          ),
        ),
      ),
    );
  }
}
이제 HomeScreen에서 ScheduleCard를 샘플로 적용해보게습니다.
import 'package:flutter/material.dart';
import 'package:calendar_shedular/component/main_calaner.dart';
import 'package:calendar_shedular/component/schedule_card.dart';

class HomeScreen extends StatefulWidget{

  const HomeScreen({Key? key}) : super(key: key);

  @override
  State<HomeScreen> createState() => _HomeScreenState();
}

class _HomeScreenState extends State<HomeScreen>{

  DateTime selectedDate = DateTime.utc(
    DateTime.now().year,
    DateTime.now().month,
    DateTime.now().day,
  );

  @override
  Widget build(BuildContext context){
    return Scaffold(
      body: SafeArea(
        child: Column(
          children: [

            MainCalander(selectedDate: selectedDate, onDaySelected: onDaySelected,),

            ScheduleCard(startTime: 12, endTime: 14, content: '프로그래밍 공부')
          ],
        ),
      ),
    );
  }

  void onDaySelected(DateTime selectedDate, DateTime focusedDate){

    setState((){
      this.selectedDate = selectedDate;
  });
  }
}
한번 실행해보겠습니다.

잘 뜨는 것을 확인할 수 있습니다.
- 오늘 날짜를 보여주는 TodayBanner 위젯
이제 가운데에 있었던 오늘의 날짜와 일정 개수를 나타내는 TodayBanner위젯을 만들어보겠습니다. /lib/component/today_banner.dart 파일로 만들겠습니다.
import 'package:flutter/material.dart';
import 'package:calendar_shedular/const/colors.dart';

class TodayBanner extends StatelessWidget{
  final DateTime selectedDate; //선택된 날짜
  final int count; //일정 개수

  const TodayBanner({
    required this.selectedDate,
    required this.count,
    Key? key
}) : super(key: key);

  @override
  Widget build(BuildContext context){
    final textStyle = TextStyle(
      fontWeight: FontWeight.w600,
      color: Colors.white,
    );

    return Container(
      color: PRIMARY_COLOR,
      child: Padding(
        padding: EdgeInsets.symmetric(horizontal: 16.0, vertical: 8.0),
        child: Row(
          mainAxisAlignment: MainAxisAlignment.spaceBetween,
          children: [
            Text(
              '${selectedDate.year}년 ${selectedDate.month}월 ${selectedDate.day}일',
              style: textStyle,
            ),
            Text('$count개',
              style: textStyle,),
          ],
        ),
      ),
    );
  }
}
이제 만든 컴포넌트를 homescreen에 적용하겠습니다.
import 'package:flutter/material.dart';
import 'package:calendar_shedular/component/main_calaner.dart';
import 'package:calendar_shedular/component/schedule_card.dart';
import 'package:calendar_shedular/component/today_banner.dart';

class HomeScreen extends StatefulWidget{

  const HomeScreen({Key? key}) : super(key: key);

  @override
  State<HomeScreen> createState() => _HomeScreenState();
}

class _HomeScreenState extends State<HomeScreen>{

  DateTime selectedDate = DateTime.utc(
    DateTime.now().year,
    DateTime.now().month,
    DateTime.now().day,
  );

  @override
  Widget build(BuildContext context){
    return Scaffold(
      body: SafeArea(
        child: Column(
          children: [

            MainCalander(selectedDate: selectedDate, onDaySelected: onDaySelected,),

            SizedBox(height: 8.0,),

            TodayBanner(selectedDate: selectedDate, count: 1),

            SizedBox(height: 8.0,),

            ScheduleCard(startTime: 12, endTime: 14, content: '프로그래밍 공부')
          ],
        ),
      ),
    );
  }

  void onDaySelected(DateTime selectedDate, DateTime focusedDate){

    setState((){
      this.selectedDate = selectedDate;
  });
  }
}
이제 실행해보겠습니다.

예쁘게 잘 나오는 것을 볼 수 있습니다.
- ScheduleBottomSheet 만들기
ScheduleBottomSheet는 사용자가 새로 추가할 일정을 입력할 수 있는 위젯입니다. 텍스트 필드 3개와 버튼 하나로 이루어져있으며 시작시간, 종료시간, 일정 내용을 입력한 후 저장 버튼을 누르면 선택된 날짜를 기준으로 일정을 생성합니다. UI를 구현하겠습니다. /lib/component/schedule_bottom_sheet.dart 파일을 만들겠습니다.
import  'package:flutter/material.dart';

class ScheduleBottomSheet extends StatefulWidget{
  const ScheduleBottomSheet({Key? key}) : super(key: key);

  @override
  State<ScheduleBottomSheet> createState() => _ScheduleBottomSheet();
}

class _ScheduleBottomSheet extends State<ScheduleBottomSheet>{

  @override
  Widget build(BuildContext context){
    return SafeArea(
        child: Container(
          height: MediaQuery.of(context).size.height / 2,
          color: Colors.white,
        )
    );
  }
}
일단 큰 틀만 잡아놓았고 이를 homescreen에 적용해보겠습니다. 플로팅 버튼도 만들어주겠습니다.
import 'package:flutter/material.dart';
import 'package:calendar_shedular/component/main_calaner.dart';
import 'package:calendar_shedular/component/schedule_card.dart';
import 'package:calendar_shedular/component/today_banner.dart';
import 'package:calendar_shedular/component/schedule_bottom_sheet.dart';
import 'package:calendar_shedular/const/colors.dart';

class HomeScreen extends StatefulWidget{

  const HomeScreen({Key? key}) : super(key: key);

  @override
  State<HomeScreen> createState() => _HomeScreenState();
}

class _HomeScreenState extends State<HomeScreen>{

  DateTime selectedDate = DateTime.utc(
    DateTime.now().year,
    DateTime.now().month,
    DateTime.now().day,
  );

  @override
  Widget build(BuildContext context){
    return Scaffold(
      floatingActionButton: FloatingActionButton(
        backgroundColor: PRIMARY_COLOR,
        onPressed: (){
          showModalBottomSheet(
              context: context,
              isDismissible: true, //배경을 탭했을때 BottomSheet 닫기
              builder: (_) => ScheduleBottomSheet()
          );
        },
        child: Icon(
          Icons.add,
        ),
      ),
      body: SafeArea(
        child: Column(
          children: [

            MainCalander(selectedDate: selectedDate, onDaySelected: onDaySelected,),

            SizedBox(height: 8.0,),

            TodayBanner(selectedDate: selectedDate, count: 1),

            SizedBox(height: 8.0,),

            ScheduleCard(startTime: 12, endTime: 14, content: '프로그래밍 공부')
          ],
        ),
      ),
    );
  }

  void onDaySelected(DateTime selectedDate, DateTime focusedDate){

    setState((){
      this.selectedDate = selectedDate;
  });
  }
}
한번 실행해보겠습니다.
잘 나오는 것을 볼 수 있습니다.
- 일정 필드 내용 구현
이제 실제로 일정 필드를 구현하겠습니다. 일정 필드를 lib/component/custom_text_field.dart 파일로 만들겠습니다.
import 'package:flutter/material.dart';
import 'package:calendar_shedular/const/colors.dart';

class CustomTextField extends StatelessWidget{
  final String Label;

  const CustomTextField({
    required this.Label,
    Key? key
}) : super(key: key);

  @override
  Widget build(BuildContext context){
    return Column(
      crossAxisAlignment: CrossAxisAlignment.start,
      children: [
        Text(Label,
        style: TextStyle(
          color: PRIMARY_COLOR,
          fontWeight: FontWeight.w600,
          ),
        ),
        TextFormField(), //폼안에서 텍스트 필드를 쓸때 사용
      ],
    );
  }
}
이거를 이제 ScheduleBottomSheet에 적용해보겠습니다.
import  'package:flutter/material.dart';
import 'package:calendar_shedular/component/custom_text_field.dart';

class ScheduleBottomSheet extends StatefulWidget{
  const ScheduleBottomSheet({Key? key}) : super(key: key);

  @override
  State<ScheduleBottomSheet> createState() => _ScheduleBottomSheet();
}

class _ScheduleBottomSheet extends State<ScheduleBottomSheet>{

  @override
  Widget build(BuildContext context){
    return SafeArea(
        child: Container(
          height: MediaQuery.of(context).size.height / 2,
          color: Colors.white,
          child: CustomTextField(
          Label: '시작시간',
        ),
        ),
    );
  }
}
한번 잘 되는지 봐보겠습니다.

이제 Custom_text_field를 꾸며보겠습니다.
import 'package:calendar_shedular/const/colors.dart';
import 'package:flutter/material.dart';
import 'package:flutter/services.dart';

class CustomTextField extends StatelessWidget {
  final String label;
  final bool isTime;   // 시간 선택하는 텍스트 필드인지 여부

  const CustomTextField({
    required this.label,
    required this.isTime,

    Key? key,
  }) : super(key: key);

  @override
  Widget build(BuildContext context) {
    return Column(  // ➋ 세로로 텍스트와 텍스트 필드를 위치
      crossAxisAlignment: CrossAxisAlignment.start,
      children: [
        Text(
          label,
          style: TextStyle(
            color: PRIMARY_COLOR,
            fontWeight: FontWeight.w600,
          ),
        ),
        Expanded(
          flex: isTime ? 0 : 1, // ➏
          child: TextFormField(
            cursorColor: Colors.grey,    // 커서 색상 변경
            maxLines: isTime ? 1 : null, // ➊ 시간 관련 텍스트 필드가 아니면 한 줄이상 작성 가능
            expands: !isTime, // ➋ 시간 관련 텍스트 필드는 공간 최대 차지
            keyboardType: isTime ? TextInputType.number : TextInputType.multiline, // ➌ 시간 관련 텍스트 필드는 기본 숫자 키보드 아니면 일반 글자 키보드 보여주기
            inputFormatters: isTime
                ? [
              FilteringTextInputFormatter.digitsOnly,
            ]
                : [], // ➍ 시간 관련 텍스트 필드는 숫자만 입력하도록 제한
            decoration: InputDecoration(
              border: InputBorder.none,          // 테두리 삭제
              filled: true, // 배경색을 지정하겠다는 선언
              fillColor: Colors.grey[300],      // 배경색
              suffixText: isTime ? '시' : null, // ➎ 시간 관련 텍스트 필드는 ‘시' 접미사 추가
            ),
          ),
        ),
      ],
    );
  }
}
만약 시간관련이라면 flex를 0으로해서 최소로 줄이고 시간관련이 아니라면 flex를 1로 해서 최대로 늘립니다. 이제 schedule_bottom_sheet에 적용해보겠습니다.
import 'package:flutter/material.dart';
import 'package:calendar_shedular/component/custom_text_field.dart';
import 'package:calendar_shedular/const/colors.dart';

class ScheduleBottomSheet extends StatefulWidget {
  const ScheduleBottomSheet({Key? key}) : super(key: key);

  @override
  State<ScheduleBottomSheet> createState() => _ScheduleBottomSheetState();
}

class _ScheduleBottomSheetState extends State<ScheduleBottomSheet> {
  @override
  Widget build(BuildContext context) {
    final bottomInset = MediaQuery.of(context).viewInsets.bottom;

    return SafeArea(
      child: Container(
        height: MediaQuery.of(context).size.height / 2 +
            bottomInset, // ➋ 화면 반 높이에 키보드 높이 추가하기
        color: Colors.white,
        child: Padding(
          padding:
          EdgeInsets.only(left: 8, right: 8, top: 8, bottom: bottomInset),
          child: Column(
            // ➋ 시간 관련 텍스트 필드와 내용관련 텍스트 필드 세로로 배치
            children: [
              Row(
                // ➊ 시작 시간 종료 시간 가로로 배치
                children: [
                  Expanded(
                    child: CustomTextField(
                      // 시작시간 입력 필드
                      label: '시작 시간',
                      isTime: true,
                    ),
                  ),
                  const SizedBox(width: 16.0),
                  Expanded(
                    child: CustomTextField(
                      // 종료시간 입력 필드
                      label: '종료 시간',
                      isTime: true,
                    ),
                  ),
                ],
              ),
              SizedBox(height: 8.0),
              Expanded(
                child: CustomTextField(
                  // 내용 입력 필드
                  label: '내용',
                  isTime: false,
                ),
              ),
              SizedBox(
                width: double.infinity,
                child: ElevatedButton(
                  // [저장] 버튼
                  // ➌ [저장] 버튼
                  onPressed: onSavePressed,
                  style: ElevatedButton.styleFrom(
                    primary: PRIMARY_COLOR,
                  ),
                  child: Text('저장'),
                ),
              ),
            ],
          ),
        ),
      ),
    );
  }

  void onSavePressed() {}
}
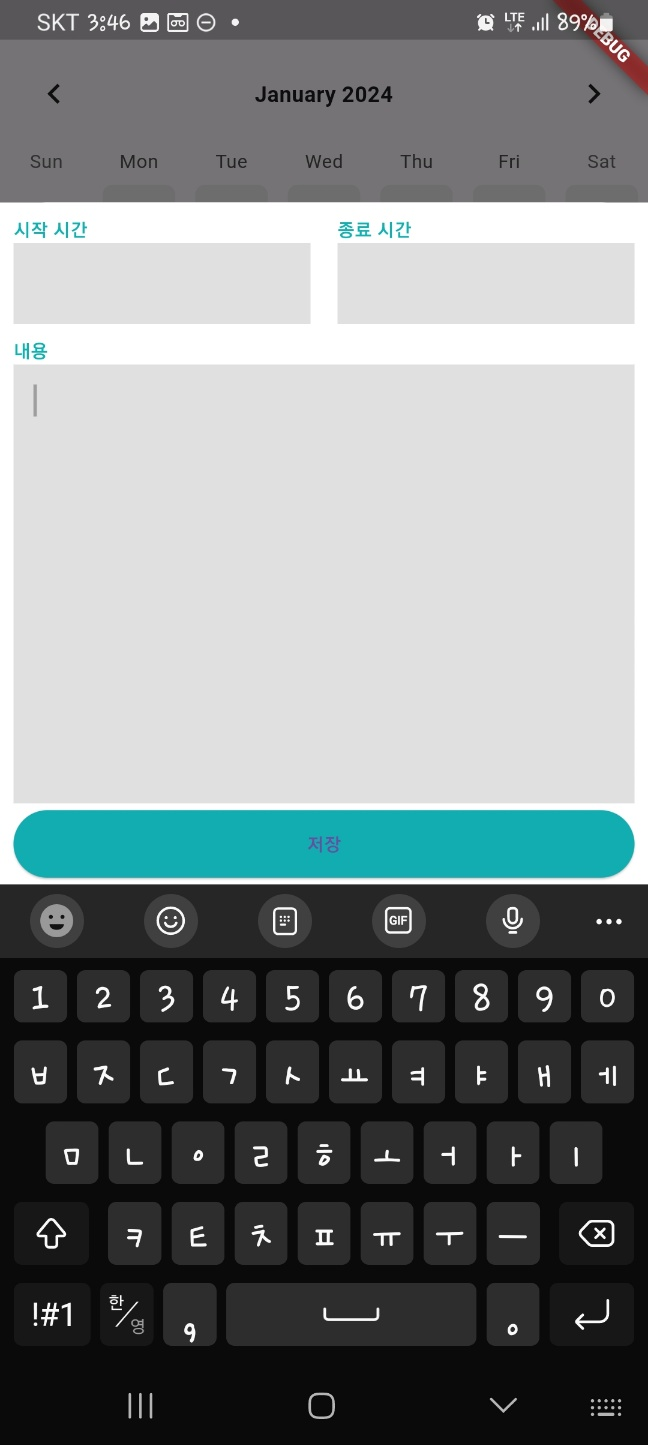
한번 실행해보겠습니다.
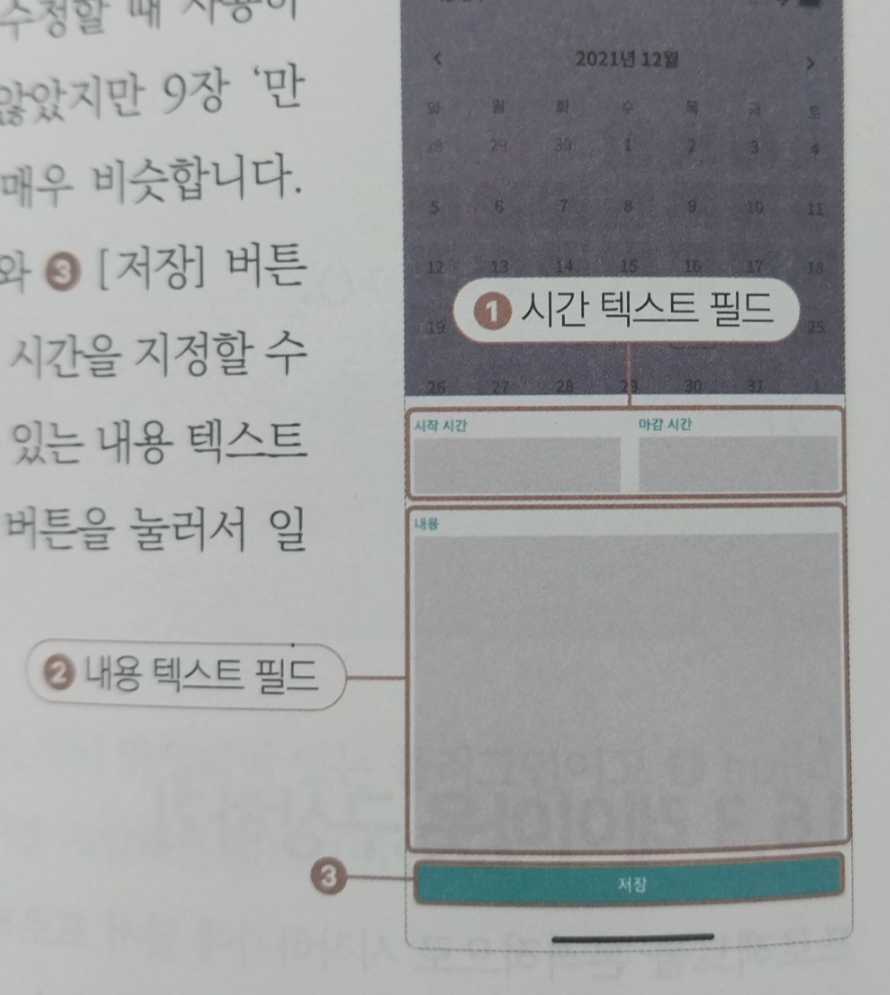
이제 마지막으로 시간을 입력하기위해 터치하게되면 키보드가 올라오는데 이때 키보드가 올라온만큼 custom_bottom_sheet도 올려주기위해서 로직을 짜놨습니다. 이제 home_screen에 스크롤이 가능하게해서 이를 적용해보겠습니다.
import 'package:flutter/material.dart';
import 'package:calendar_shedular/component/main_calaner.dart';
import 'package:calendar_shedular/component/schedule_card.dart';
import 'package:calendar_shedular/component/today_banner.dart';
import 'package:calendar_shedular/component/schedule_bottom_sheet.dart';
import 'package:calendar_shedular/const/colors.dart';

class HomeScreen extends StatefulWidget{

  const HomeScreen({Key? key}) : super(key: key);

  @override
  State<HomeScreen> createState() => _HomeScreenState();
}

class _HomeScreenState extends State<HomeScreen>{

  DateTime selectedDate = DateTime.utc(
    DateTime.now().year,
    DateTime.now().month,
    DateTime.now().day,
  );

  @override
  Widget build(BuildContext context){
    return Scaffold(
      floatingActionButton: FloatingActionButton(
        backgroundColor: PRIMARY_COLOR,
        onPressed: (){
          showModalBottomSheet(
              context: context,
              isDismissible: true, //배경을 탭했을때 BottomSheet 닫기
              builder: (_) => ScheduleBottomSheet(),
              isScrollControlled: true
          );
        },
        child: Icon(
          Icons.add,
        ),
      ),
      body: SafeArea(
        child: Column(
          children: [

            MainCalander(selectedDate: selectedDate, onDaySelected: onDaySelected,),

            SizedBox(height: 8.0,),

            TodayBanner(selectedDate: selectedDate, count: 1),

            SizedBox(height: 8.0,),

            ScheduleCard(startTime: 12, endTime: 14, content: '프로그래밍 공부')
          ],
        ),
      ),
    );
  }

  void onDaySelected(DateTime selectedDate, DateTime focusedDate){

    setState((){
      this.selectedDate = selectedDate;
  });
  }
}
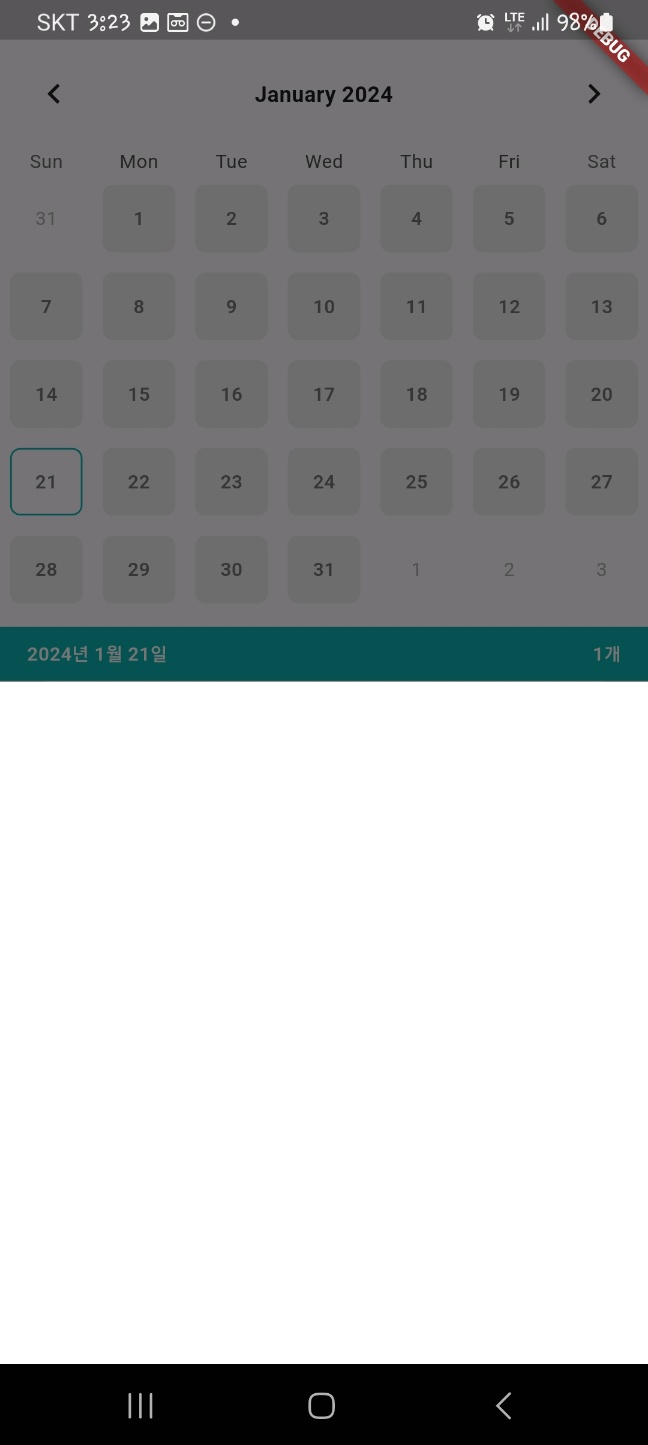
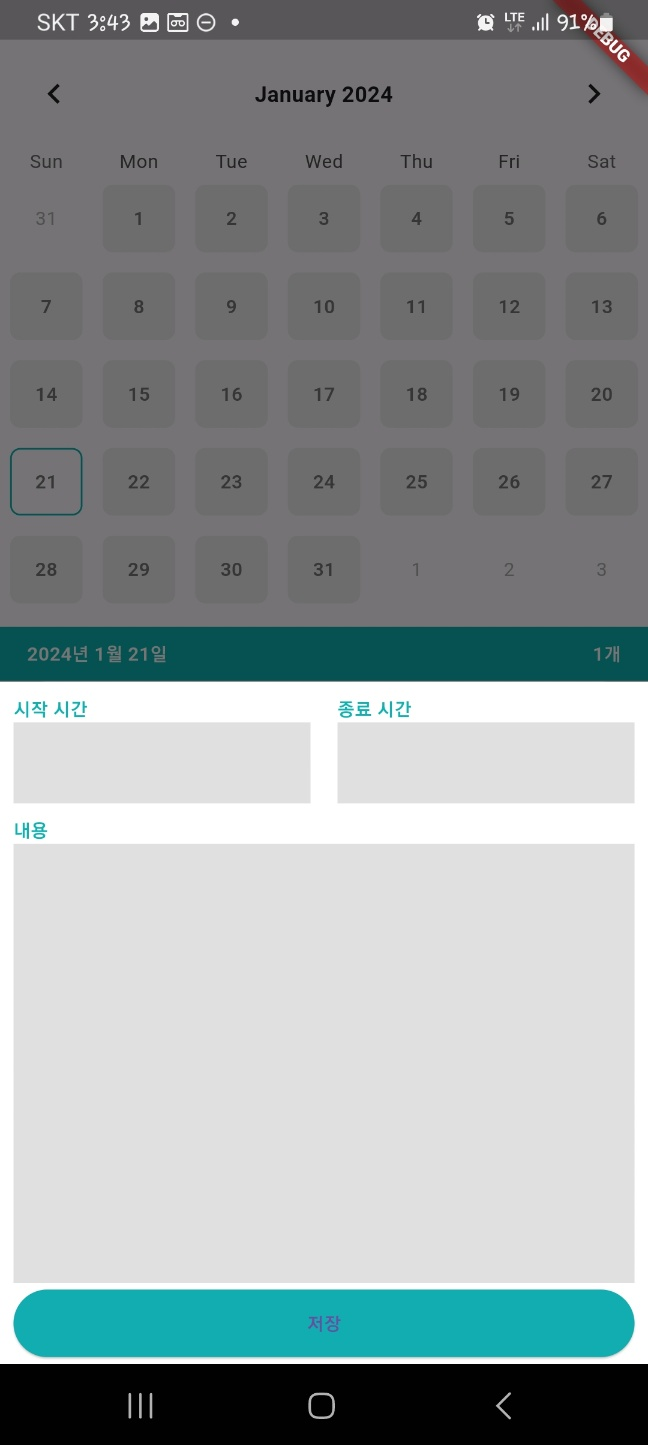
실제 실행해보겠습니다.
잘 올라가는 것을 볼 수 있습니다.
- 달력 언어 설정
이제 main.dart파일에 intl 패키지를 초기화하고 다국어화하 한다음, main_calendar.dart파일에서 한국어로 변경해주겠습니다.
import 'package:flutter/material.dart';
import 'package:calendar_shedular/screen/home_screen.dart';
import 'package:intl/date_symbol_data_local.dart';

void main() async{

  WidgetsFlutterBinding.ensureInitialized(); //플러터 프레임워크가 준비될때까지 대기

  await initializeDateFormatting(); //intl 초기화(다국어화)

  runApp(
    MaterialApp(
      home: HomeScreen(),
    )
  );
}
이제 main_calander.dart파일에서 한국어로 변경해주겠습니다.
import 'package:flutter/material.dart';
import 'package:table_calendar/table_calendar.dart';
import 'package:calendar_shedular/const/colors.dart';

class MainCalander extends StatelessWidget{

  final OnDaySelected onDaySelected;
  final DateTime selectedDate;

  MainCalander({
    required this.onDaySelected,
    required this.selectedDate
  });

  @override
  Widget build(BuildContext context){

    return TableCalendar(
      locale: 'ko_kr', //한국어로 변경
      onDaySelected: onDaySelected, //날짜 선택시 실행할 함수

        selectedDayPredicate: (date) => //선택할 날짜를 구분할 로직
          date.year == selectedDate.year&&
          date.month == selectedDate.month&&
          date.day == selectedDate.day,


        focusedDay: DateTime.now(), //현재 달력 위치
        firstDay: DateTime(1800, 1, 1), //달력의 처음 날짜
        lastDay: DateTime(3000, 1, 1), //달력의 마지막 날짜
        headerStyle: HeaderStyle(
          titleCentered: true, //제목 중앙에 위치하기
          formatButtonVisible: false, //달력 크기 선택 옵션 없애기
          titleTextStyle: TextStyle(
            fontWeight: FontWeight.w700,
            fontSize: 16.0,
          )
        ),

      calendarStyle: CalendarStyle(
        isTodayHighlighted: true,
        defaultDecoration: BoxDecoration( //기본 날짜 스타일
          borderRadius: BorderRadius.circular(6.0),
          color: LIGHT_GREY_COLOR,
        ),

        weekendDecoration: BoxDecoration( //주말 날짜 스타일
          borderRadius: BorderRadius.circular(6.0),
          color: LIGHT_GREY_COLOR,
        ),

        selectedDecoration: BoxDecoration( //선택된 날짜 스타일
          borderRadius: BorderRadius.circular(6.0),
          border: Border.all(
            color: PRIMARY_COLOR,
            width: 1.0
          )
        ),

        defaultTextStyle: TextStyle( //기본 글꼴
          fontWeight: FontWeight.w600,
          color: DARK_GREY_COLOR,
        ),

        weekendTextStyle: TextStyle( //주말 글꼴
          fontWeight: FontWeight.w600,
          color: DARK_GREY_COLOR,
        ),

        selectedTextStyle: TextStyle( //선택된 날짜 글꼴
          fontWeight: FontWeight.w600,
          color: DARK_GREY_COLOR,
        )
      ),
    );
  }
}
실행해보겠습니다.

요일 부분이 한국어로 변했습니다.
- 마지막
이제 이어서 12장에서 데이터베이스를 연동해보겠습니다. 처음은 로컬환경입니다.
'Programming > Flutter' 카테고리의 다른 글
| Flutter 프로그래밍 - 13(서버와 연동하기) (2) | 2024.01.26 |
|---|---|
| Flutter 프로그래밍 - 12(일정관리앱 로컬 DB적용) (1) | 2024.01.22 |
| Flutter 프로그래밍 - 10(코팩 튜브) (0) | 2024.01.20 |
| Flutter 프로그래밍 - 9(포토 스티커) (0) | 2024.01.16 |
| Flutter 프로그래밍 - 8(동영상 플레이어) (0) | 2024.01.14 |


